Measuring for pull out
shelves
The short version - Easy as 123
-
Width - Enter the clear opening width at the level
the shelf will be installed
-
Depth - Select the closest depth to your available
depth without going over, kind of like the price is right!
-
Mounting - Pick the mounting style that is right
for your installation, for most cabinets this is base mount
Measure Twice, Order
Once!
A deeper look at measuring for sliding
shelves including
"Steve’s Tips to a Perfect
Shelves That Slide fit"
Do it yourself
and save on pullout
shelving
How to measure for the best custom pull out shelves
It is important to identify what style cabinet you have. The traditional
cabinet style in the United States has been face framed cabinets so that is the
default for measuring. Frameless cabinets are
becoming more common and there are a few things different about measuring frame
less cabinets
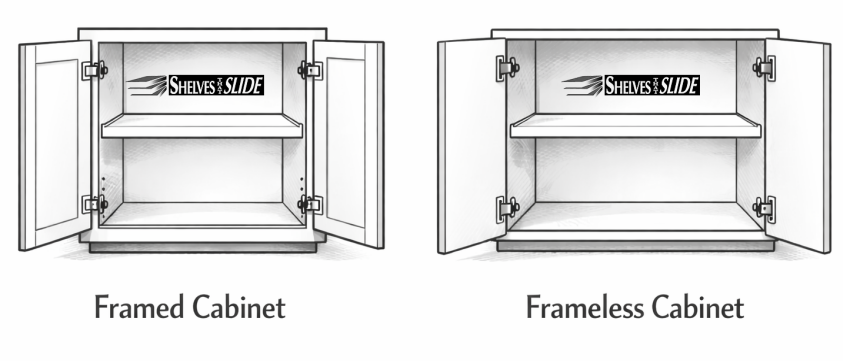
Framed Cabinet - Called a framed cabinet because it has a
face frame that attaches to the front of the cabinet sides,
top and bottom. The face frame is often 1 1/2" wide and
consists of vertical stiles and horizontal rails. The inside
of the cabinet is wider than the frame opening. Usually
about 3/4" on each side but that can vary
Frameless Cabinet
- As you can guess the frameless cabinet
does not have a face frame. The front edge of the sides, top
and bottom are the front of the cabinet. If the cabinet did
not have doors the inside width and opening width would be
the same. The hinges often protrude farther into the opening
than traditional cabinets and the doors almost always reduce
the opening width
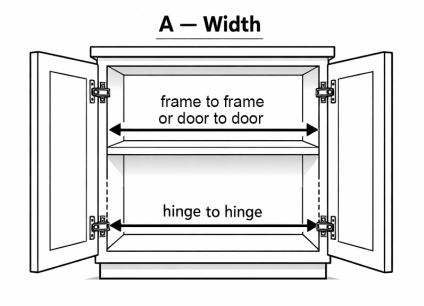
Clear Cabinet Opening (Dimension A)
The clear opening width is the space your pull-out shelf
needs to clear at the height it will be installed
Tips:
-
Always provide the clear opening width of your cabinet, not
the width you want the finished wood box
-
For
lower shelves, the width is usually the width between the hinges as
they protrude into the cabinet opening
-
For
upper shelves, measure between cabinet face frames or from
door to face frame or door to door, whatever the space the shelf
need to clear to pull out. The hinges do not usually interfere with
the upper shelf
-
Ensure the cabinet door opens at least 90°. If a fully open
door reduces the opening slightly, use this reduced dimension.
This may happen due to a knob on the door hitting a wall or the
handle of the oven etc.
-
It is
common for lower shelves to be slightly narrower than upper
shelves due to the hinge intrusion
Ordering
Notes:
-
Always provide the clear cabinet opening width when ordering.
We’ll adjust for sliding hardware.
-
Shelves are custom-made in 1/16" increments for a precise
fit.
-
Maximum width for premium 2 3/8" tall pull-out shelves:
39" cabinet opening.
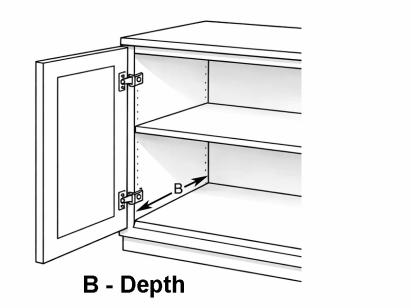
Depth Framed cabinet
Shelves That Slide
offers sliding shelves in depths ranging from
11 3/4" up to
31 3/4", in convenient
2" increments (9
3/4" on special order)
-
Standard Kitchen Cabinets:
Typically use shelves that are
21 3/4" or
22 3/4" deep.
-
Standard Bathroom Cabinets:
Usually require a 19 3/4"
deep shelf.
-
Custom Depths:
Shelves can go up to 32"
deep, with costs increasing for deeper shelves.
How to Measure for DIY Pull-Out
Shelves
-
Measure
from the inside edge of the
cabinet face frame (back side, not the front) to the
back wall of the cabinet—this
is your Dimension B.
-
Check for any
obstructions like
pipes, wires, or outlets, and adjust your measurement accordingly.
-
Just like the price is right, pick the closest without going over
and leave yourself at least 1/4" extra. I.E. if you
measure 22 1/2" you select 21 3/4". If you have 23 3/4" go 22 3/4",
if you have 24" you can go 23 3/4" unless you go rear mount,
see below
-
Consider depth vs. width:
Sometimes a slightly
narrower shelf allows for
full depth, which
can be more practical than a full-width shelf that is
3"– 4" shorter.
Special Considerations
-
For
rear mount,
make sure you have at least 1/2" over selected shelf depth. Cabinets over 24" deep
may require special-order
shelves with
longer slides.
-
Ball Bearing full extension slides are available
in lengths up to 27 3/4".
Frameless
Same
as framed except measure from the back wall to the front of the cabinet
and then subtract 1/2".
Inset doors
Framed or Frameless
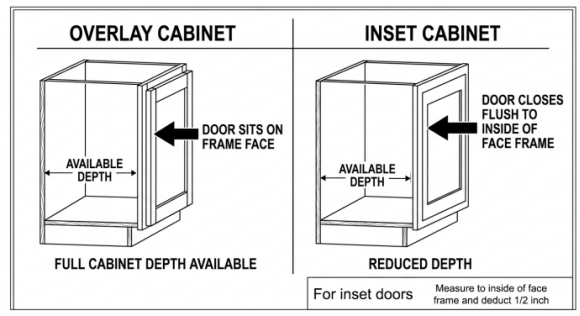
For
inset doors, measure from the back wall to the back of the closed door
and subtract 1/4" for base mount or 1/2" for rear mounting
Mounting style
There are four standard methods of mounting pullout shelves depending
on whether your cabinet has an existing full depth shelf, a shallow "half shelf"
or no shelf at all
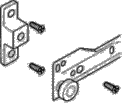
Base mount - 4 L brackets - the most common method

A base mount is pretty much as it sounds. It is mounting to the base of the cabinet
or to an existing full depth shelf. This is perhaps the easiest installation
available and also can be the strongest. The drawer slides will have four "L"
brackets attached and these "L" brackets are secured to your existing
shelf or cabinet floor. When you order base mount the L brackets come
preinstalled on to the slides. In framed cabinets this L brackets sits behind the face frame
so we do not account for it in the width.
If you have a frameless cabinet you may need to deduct for the L bracket, see
section below this paragraph. It is suggested that if the cabinet has
adjustable shelves and if the shelf clips for the shelf you are mounting to is plastic
you should replace
them with metal shelf clips. We offer metal shelf clips with holes in them for
locking the shelf in place
here. It is also necessary to secure the back of adjustable shelves so that
they can not tip up when the sliding shelf is extended. This can be
accomplished simply by inserting a couple of screws in the back or side walls of
the cabinet with
the heads of the screws protruding enough to hold the shelf down and prevent tipping
when the slider is extended or replace your shelf clips with
metal shelf pins. Base mounting is the most common method of installing the
shelves
Note: L brackets lift the shelf 5/8" above the
surface it is mounted to
Frameless Base Mount
On frameless cabinets with a single door or no doors there
is no place for the L bracket that normally sits behind the cabinet face
frame. Because of this you must deduct from the clear opening width. The L
brackets use 1/4" on each side. If you have a single door you
will need to deduct 1/4". If you have a cabinet with no doors and
you want to base mount you will need to deduct 1/2" to allow for the L
brackets. If you have double doors and hinges
or doors that protrude at least 1/4" into the opening you can order the clear opening
with no deductions. Alternatively you can choose to remove the L
brackets from the flush side of the cabinet and mount the slide directly
to the wall in which case not deduction for the L brackets needs to be
done. It is a good idea to set the slide in place while still on the L
brackets and mark the location on the cabinet side. Then you can remove
the L brackets and mount the slide where you marked

Half Shelf - 2 rear L brackets

Many cabinets have a shallow upper shelf that we refer to
as a half shelf, this is a shelf that
is usually 9" to 12". You do not have to put in a shallow pull out
shelf just because your cabinet has a shallow shelf. You will use
the half shelf to mount the back of the slides while the front of
the sliding shelf hardware will attach to the cabinet's face frames. The slides
will have two "L" brackets in the rear to attach to your half shelf. If
your doors protrude into the cabinet opening so that your clear opening is
smaller than the framed opening you will need to order spacers to
make up for the
difference. For example if you have a
15" opening and the shelf needs to be 14 7/8" because the door sticks
out 1/8" you will need to order a 1/8" spacer for you to put between the slide
and the cabinet face frame. If this is a double door cabinet and both doors
reduce the opening you will need to order spacers for both sides. We offer
special
Frame Spacers of our own design in sizes from 1/8" to 3/4" in 1/16"
increments. This installation is very solid as long as long as the face
frames are a hardwood and not a particle board. We suggest reinforcing particle
board face frames with a hardwood piece placed vertically or installing a full
stationary shelf to mount the slider to. We offer
3/4" hardwood blocks here which work well for this or you can supply your
own. Make sure the half shelf is secure so
that it will not tip up when the sliding shelf is extended. See full shelf
section for tip on screws in the back wall. The front of slide cannot attach to face
frame and will have to be built out from the sidewall of the cabinet to use the
half shelf mount. The same rules for frameless cabinets with a half shelf apply as they do for the
base mount regarding deduction for the L brackets

What if there is no existing shelf?
If you want to install a Pull Out Shelf and there is no existing shelf,
there are two types of no shelf installations. The first is with rear
mount sockets and the second is side mount.
Rear Mount
Sockets are
mounted to the end of the sliding hardware and are attached to the cabinet's back
wall. The front of the slide is attached to the cabinet face frame as with the
half shelf installation. The 3/4 extension slides use plastic rear sockets while
the ball bearing full extension have metal ones. Just like the half
shelf mount the front of the slides will attach to the cabinet face
frame for framed cabinets. If the door(s) reduce the opening width you
will need spacers. Our
framed spacers
are great for face frame cabinet, designed and
3D printed in house.
For frameless cabinets the Euro spacers are the best choice. If your
cabinet is not predrilled with 5mm holes 32mm apart (about 1 1/4") we
offer a
hole jig and drill bit set
Framed cabinet rear mount

Frameless rear mount

Side Mount
The second method of installing with no shelf is to
side mount. Spacers are used to attach the slides directly to the cabinet
sidewalls. Measuring the exact inside width is critical so make sure you check
out the graphic on
Steve's
tape measure tips and tricks page. We offer a
jig and bit in our hardware section for drilling holes for the euro
spacers. The drill jig has hole spacing for the standard 3/4 extension
slides and the ball bearing full extension. The jig works with 3/4
extension slides from 16" to 22" and the ball bearing full extension
slides from 18" to 24" deep. The euro spacers are available from 1/2" to
1 1/2" in 1/4" increments and use pozilock screws that screw into 5mm
holes that are 32mm apart vertically (about 1 1/4"). The sidewalls must be thick enough so that
you do not drill through. Always check sidewall depth and be sure the
drill bit stop is set so that you do not drill through. Another
option for side mounting is to use wood to build up the space. for
single upper shelves you can run the wood horizontally at the level you
want the shelf making sure it builds out the inside of the cabinet to
match the ordered clear opening width. If you are installing a series of shelves in one cabinet
like a pantry cabinet it may
be better to cut a piece of wood the same thickness as the side to build it out
as needed. If
this wood is mounted vertically from the base of the cabinet up the installation
can be very sturdy and support higher weight items such as canned food in a pantry. The same requirements for measuring apply for the no
shelf install as they do to the half shelf installation. Make sure to order the
spacers that you need when placing your order.

Frameless side mount
Same as the framed except
instead of clearing the framed opening you are often just clearing the
door overlap and if a single door cabinet one slide will be mounted
directly to the sidewall with no spacers needed

Slide Type
We offer two types of slides for our pull out shelves. The
standard slides are 3/4 extension and we also offer an upgrade full extension
ball bearing slides with soft close. The standard 3/4 extension slides
work great for most installations and if you are trying to get the best pull out
shelves without spending too much the 3/4 extension are a great choice. For
smaller items on a shelf like canned goods in a pantry you get full access the
full extension ball bearing slides, they slide very smooth and customers
appreciate the soft close feature
Spacers

Available in 1/8", 1/4", 3/8" and 1/2"
these spacers are not intended to be stacked nor combined with the other
spacer styles
Available from 1/2" to 1
1/2" in 1/4" increments
Originally found on
frameless cabinets with the 32mm system. That is a series of hole 32mm
apart vertically which is about 1 1/4". Many of the spacers use every
other hole so 64mm apart (about 2 1/2"). The spacing horizontally was
standard and matched the spacing on Euro style hardware such as hinges
and drawer slides. Over the years it has been adopted by many cabinet
makers for both framed and frameless cabinets but in many cases
only the vertical spacing remained the same. It seems rare these
days to find cabinets that have the correct hole spacing which is why we
designed the
hole jig which we make in house using a laser for precision hole
size and spacing (see below).
Frame spacers are
unique to Shelves That Slide as they are our own design which we
3D print in house. We offer them in sizes from 1/8" to 3/4" in
1/16" increments. They work for both the standard 3/4 extension
slides and the ball bearing full extension. They are secured to the
slide with a pozi drive screw and then set in place and you
secure the slide and the spacer to the cabinet face frame. These only
work on face frame cabinets. They come with the pozi drive screw to secure the
slide to the spacer but no other hardware is provided. We suggest using
a screw about 3/4" longer than the spacer depth you select. A 1/4"
spacer will need a 1" long screw, a 1/2" spacer should use a 1 1/4" etc.
Be sure to predrill a 1/16" hole in the frame first to reduce the chance
of splitting. You can
order the Frame Spacers here
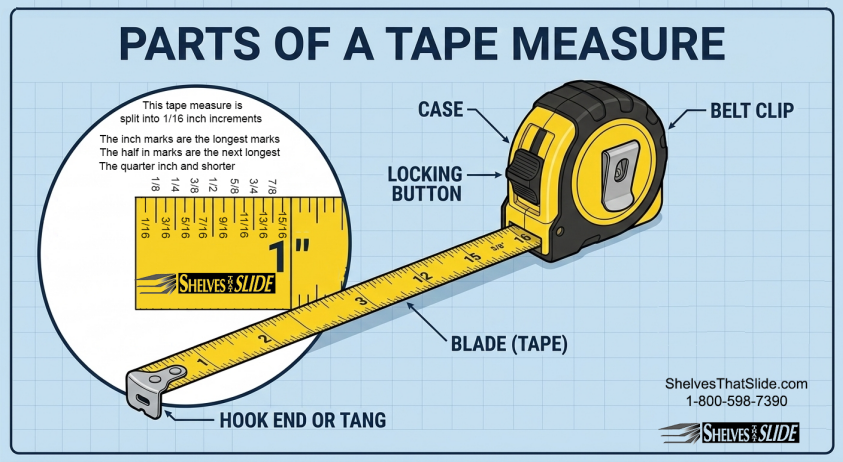
Steve's measuring tips
Why every
inch (and fraction) matters
After
35 years of installing pull-out
shelves, I’ve seen thousands of “standard” cabinets that are
anything but standard. Cabinet openings vary more than most people
realize. A two door cabinet with a center stile may take four different
size shelves. That is not a problem with pullout shelves from Shelves That
Slide
Some
sliding shelf systems are only available in
3-inch increments (9", 12", 15"
etc.). In
the world of cabinetry, that can leave a
large gap
on either or both sides of your cabinet opening! That’s not just an eyesore — it’s
lost storage space inside your
cabinet. Some slide out shelf companies let you pick every inch or maybe even every
1/4" but Shelves That Slide lets you order widths in 1/16" increments
so you can get a shelf that perfectly fits your cabinet opening
There
will usually be a little unused space inside a cabinet as the slides
must clear the opening, but you shouldn’t have to settle for shelves
that don’t fit your
cabinet
The
Shelves That Slide Precision Advantage
At
Shelves That Slide,
we build our pull-out shelves to fit
your existing cabinet
That
level of precision means no
large gaps and no wasted space. Your shelf fits
snugly and looks like it was
built with the cabinet, not added years later.
Steve’s Pro Tip
Don’t
let the fractions intimidate you.
Use a
quality tape measure,
and take a look at my tips on the
Tape Tricks Page to
get an accurate clear opening
measurement.
See our
measuring tape tips here
You measure it — we build it!
Looking for a do it yourself home improvement project to make
your life easier? Here is what you need to know to do-it-yourself install our custom made pull
out kitchen shelves. There are four ways to mount Shelves That Slide into your
cabinet. The first and most common is mounting on an existing full
size shelf or cabinet base. The second is mounting to an existing half
shelf that is 6" - 12" deep. The third is to mount to the rear
wall with sockets. The forth method is mount to the cabinet side
walls. All of these installation methods have similarities. We will cover
the basic steps first, then you can go on to the specifics for your method of
installation.
Use the shelf
The number one tip is to let the shelf be your tool for setting
the slides. There are points in every method of installation that will be
easiest to accomplish when you use the shelf as your placement guide. The drawer
slides that we use have a control side and a free side. The right side slides
are the control side, the track that the wheel rolls in is a captive one. The
metal is bent
around the wheel and the wheel will only track in that groove. The left side
slide is the free side that allows for adjustment of the assembly. For this
reason it is very important to pay attention to the left side slide. Any
problems with slide alignment will be evident here, the right side will align
itself.
Base mount installation
The easiest and usually strongest method of installing Shelves
that Slide is when you are mounting onto a full depth existing shelf or the
cabinet base. The first thing you need to consider is the existing shelf
permanent or is it adjustable. If it is a permanent shelf you can go straight to
installing the slides. If it is adjustable
you need to look at two things. The first is what are the clips or pins that are
holding it up made of? If they are plastic you need to replace them with metal
clips or pins. The front mounting of the shelf will be subjected to twice the
weight it is now exposed to when you extend a loaded shelf. The second
consideration goes right along with the first in that when the loaded shelf is
extended it will want to lift up in the back. This is easily remedied by placing a
couple of screws in either the back or the side walls (which ever is thicker,
but don't go through to an exposed wall) just above the existing shelf and leave
the head sticking out far enough to hold the screw down.
For a full shelf installation you should have two "L"
shaped brackets on each cabinet slide. The wheeled end of the cabinet part of
the slide is
the front. Set the slides onto the existing shelf or cabinet base at the
approximate width of the sliding shelf. Engage the shelf slides into the cabinet
slides by setting the wheeled end of the shelf slide over the wheeled end of the
cabinet slide. The most important side to get in place is the right side. You
can always slip the left side into place after getting the right side in properly.
Insert the shelf fully into the cabinet and align the front of the shelf to be
square with the cabinet front and have the proper set back. The proper set back depends on your cabinet
depth but it is usually about 1/2" to 3/4" back from the inside edge
of the cabinet face frame. Get your screwdriver ready! When you have the shelf
adjusted press down slightly and slide the shelf forward just far enough to
expose the rear brackets. Insert a screw in one of the slots in the right rear
bracket. Use the hole that goes side to side so you can adjust it latter, tighten moderately. Now slide the shelf back into place and check
the alignment. When it is adjusted properly slide the shelf out again to expose
the rear bracket and place a screw in the opposite side slotted hole in a slot
that goes from left to right and tighten moderately. Again slide the shelf in
and check alignment. If all is well you can carefully slide of the shelf without
disturbing the position of the front brackets. This may take a couple of tries.
Install screws in the front brackets the same as you did for the rear brackets.
Insert the shelf again and check alignment. Remember to pay careful attention to
the left side slide if the gap is too large in the rear the shelf will roll
great but as soon as you add weight you will get a bump when you slide it out. After you get everything aligned you can remove the shelf
and install a screw in the center hole of the bracket to lock it in place, two
screws per bracket is all that is needed.
Congratulations your shelf is done!!! Well almost, see plastic
thing.
The second method of installing sliding shelves is also the
second best and the second easiest. You will need a small level, preferably one
with a magnetic strip on one side. Check the existing shelf to make sure it is
secure and can not lift up. Also check to make sure the hardware that supports
the existing shelf is metal. If you have plastic hardware and plan on loading
more than lightweight items into the shelf you will have to replace the hardware
with metal. The slides for your half shelf installation will have one metal
"L" shaped bracket mounted toward the rear. The end with the wheels is
the front! If you have brackets in the rear and front, the front ones will not
be needed and should be removed. Set the rear bracket on the existing shelf and
place the front edge of the slide against the cabinet face frame, back about
3/16" from the front. Place your level on the slide and level it. When you
have the slide level mark the location of the front hole in the slide. You can
then measure the height and make a corresponding mark on the other side face
frame. It is best to drill a small pilot hole to prevent splitting, before screwing
the slide in place. After you have the front of the slides attached you can set
the shelf in place by lifting the wheels on the rear of the shelf slides over
the wheels on the front of the cabinet slides. Pay careful attention to the
right side slide. Insert the shelf all the way into the cabinet and align
the shelf to be square with the cabinet front. If there is too much space
between the cabinet face frames you will need to insert spacers or washers to
build out. You can order spacers from us in 1/8", 3/8", and 1/2"
sizes. You may also be able to find something similar in a local hardware store.
Get your screwdriver ready! Check the alignment of the left side slide and when
it is properly aligned press down slightly on the shelf and extend it far enough
to see the rear bracket. Place a screw in one of the slotted holes and tighten
moderately. Reinsert the shelf and check slide alignment. When alignment is
correct repeat the process of extending the shelf and insert a screw in the
other side's bracket. Again insert the shelf and adjust as needed. When
everything is aligned extend the shelf again and place a screw in the center
hole of the bracket to lock it in place. Congratulations your shelf is done!!!
Well almost, see plastic thing
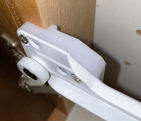
Rear mount sockets are a great alternative mounting for shelves
where there will not be much weight. They are perfect for adding a shelf in a
bathroom cabinet. The main limitation is if they are loaded with a lot of weight
they tend to only be good for a year or two before they succumb to the stress.
The first step is to determine the height that you want the shelf. Make a mark
on both cabinet face frames for the bottom of the shelf. Insert the cabinet
slides partially into the plastic sockets (you must have specified a rear socket
installation when ordering) note the brackets are different for left and right
sides. Attach the front end of the slides (the end with the wheels) to the
cabinet face frame where you marked. You will need to push the slide slightly
against the back wall of the cabinet to get the socket seated to the needed
depth. Install the shelf by lifting the rear end of the shelf slides (the end
with the wheels) over the wheels on the front of the cabinet slides. Slide the
shelf in completely and align it to be square with the front of the cabinet. Now
comes the fun part. Make a line on the back wall to mark the position of each
slide for the horizontal placement. You can now remove the shelf and place a
level on the cabinet slide. Align the slide with the previous line that you made
and level the height. Now you can either install one screw in the socket or mark
another line for the vertical position. Repeat this process for the other side
and after you have one screw in each socket reinstall the shelf and check for
proper operation. Once you have the shelf adjusted, install at least one more
screw in each socket. If you are having trouble getting the shelf to slide
smoothly make sure the slides are parallel to each other and not twisted.
Congratulations your shelf is done!!! Well almost, see plastic
thing. Also they will not work with shelves deeper than 22 3/4" unless
longer slides are used.
When you need more weight capacity than the rear socket method
can provide and you either don't have or don't want full or half shelves in your
cabinet, the answer is side mounting. We can provide spacers to install the
cabinet slides to the cabinet side walls. The problem is the cabinet side walls
are usually not more than 1/2" thick and there is about 1" of space or
more that needs to be spaced out. Leverage will lead to this being a weak
installation. However if you can install vertical strips of wood on both sides
(two on each side, one near the front and the other near the back) that provide
the proper filling to match the space behind the cabinet face frame, a side
mount installation can be the strongest and most space efficient installation.
It is best to use a piece of wood the same thickness as the space behind the
face frame that runs from the bottom of the cabinet to above the height that you
want the shelf installed. You can glue and screw this piece of wood in place to
make a secure attachment. After the wood is installed you can measure up and
make a mark where you want the slides installed. Simple screw the slides in
where marked and you should be able to install the sliding shelf. Just lift the
rear end of the shelf slides (the end with the wheel) over the wheels on the
front end of the cabinet slides. Insert the shelf fully and check for alignment
paying careful attention to the left side alignment, adjust as needed.
Congratulations your shelf is done!!! Well almost, see plastic
thing.
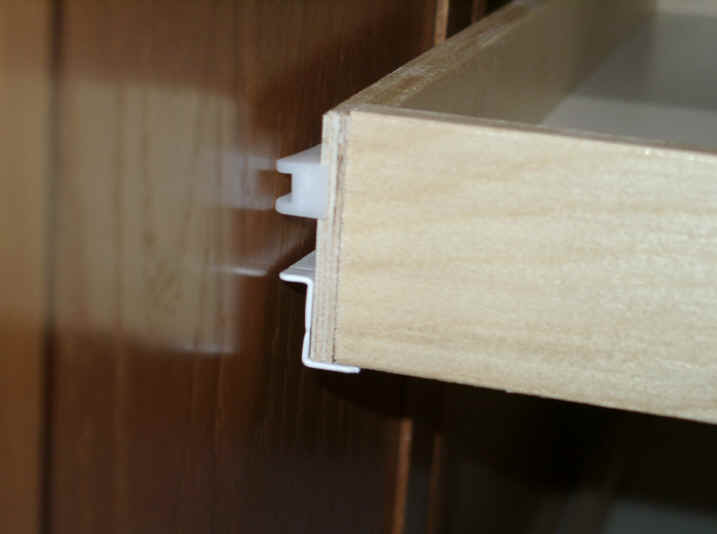
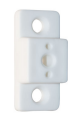
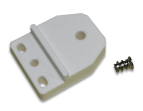
Finally we come to that white plastic thing. That thing is a
door protector. There is one door protector per shelf included. If you have a
cabinet with two doors closing on one shelf (a door on both the left and right
side with no center divider) you will need two door protectors per shelf. Please
request the extra door protectors under special instructions. No door protectors
are needed for the economy shelves due to the extended front wood trim.
The door protector is mounted to the side of the shelf. The purpose of the door protector is of course to protect the door. The plastic
sticks out about 1/16" more than the drawer slide to keep you from
scratching the door in case it is not opened fully before sliding out the shelf.
Just screw the door protector to the side of the shelf (one screw). Watch for
hinge clearance and if the door has a recessed panel make sure you mount the
door protector as low as possible. The door protectors will not work on
standard height shelves with full extension slides. Fortunately the front of the
full extension slides is rounder than the 3/4 extension so the pullouts do not
need them as badly.
Please note: The actual
size of the wood box is 1" less than the size of the clear cabinet
opening that you provide. This is to allow for the sliding shelves
slides which use 1/2" on each side and must pass through the cabinet
opening. We tell you that only so that when you receive the shelf you do
not think we made an error. Do not adjust your width thinking that
somehow this inch can can sit behind the frame because if you do your
shelf will not fit!
Disclaimer
This page is offered as a guide for installing a pull out shelf and it is not intended to offer
every detail for every possible installation. It is expected that the home
improvement
do-it-yourselfer has sufficient knowledge as to judge the soundness of their
installation of kitchen and bathroom shelves.
Click here for a
Printable version of this page in PDF format
Click here for our Measuring worksheet and fax order form
Because it always helps to have another
viewpoint on home improvement and shelving systems installations
Here are some installation instructions
from a few of our customers
My assembly instructions follow. I had a full non-adjustable bottom shelf in
my cabinet, so I only wrote the instructions for this option.
FULL SHELF INSTALLATION
The number one tip is to let the installed right side cabinet guide
be the control for installing the left side cabinet guide.
The right side sliding shelf slide has a bent edge around the
wheel track and the wheel on the slide is to the rear. Assemble the right cabinet
guide with its wheel in front to the right sliding shelf slide.
Place this assembly onto your cabinet shelf and place it so the back of the
sliding shelf touches the front of your cabinet back. The shelf is centered on
the door opening. Now slide the left side cabinet guide with its wheel to
the front under the left sliding shelf slide (no bent over track edge).
You are now ready to set measurements for proper assembly.
First check for set back dimension. Move the shelf assembly forward to within
½" to ¾" from the back inside of the face frame. It should be
centered on the available opening and squared to the front of the cabinet back.
Get your screwdriver and supplied screws. All screws are to be lightly hand
tightened until final alignment is accomplished. Lightly push down on the right
side of the shelf as you move it towards you to expose the rear bracket on the
right cabinet guide. Maintaining the above alignment, drive a screw
through the rear front to back slotted hole in the exposed rear bracket.
While still maintaining alignment install a screw into the front left to
right slotted hole of the same bracket. Remove the shelf and the left
side cabinet guide leaving the screwed in place right side cabinet
guide. This will expose the front bracket on the right cabinet guide and
once again check square to the front of the cabinet back and install two screws
just as was done to the right rear bracket.
Next step is to install the left side cabinet guide. While holding the
left side cabinet guide against the cabinet shelf bottom and
approximately a shelf width left of the already installed right cabinet guide,
reinstall the shelf onto the attached right side cabinet guide and onto
the left side cabinet guide. Check your alignment and square. Install two
screws into each bracket (front and back) on the left side using the same method
as used on the right side cabinet guide.
Reinstall the shelf into the right side cabinet guide and onto the
left side cabinet guide. Move the shelf back and forth and if it binds
adjust the left side cabinet guide to allow the shelf to move easily.
When you are satisfied everything is aligned and moving smoothly install and
tighten a screw into the center hole of each of the four brackets. Tighten all
other screws.
Congratulations your shelf is done!!!! Well almost, see the plastic thing.
PLASTIC THING
Finally we come to the white plastic bumper, which is utilized to prevent
damaging the inside surface of the door. This might occur when closing against a
partially protruding shelf or when the door is in the way of your pulling out a
shelf. The plastic bumper is mounted with one screw to the front of the shelf
closest to the door hinges. Watch for hinge clearance and if door has a recessed
panel make sure you mount the door protector bumper as low as possible. Included
with very wide shelves, two bumpers are supplied assuming the opening has two
doors per shelf.
This "honey do" project was a snap and I believe if you use my
ideas other neophyte installers will be as pleased as I am with your product and
its ease of installation.
Respectfully,
Harry S.
Oregon
Steve, the shelves arrived and are installed --
thanks!
I installed your drawers on movable shelves. I
read your installation instructions on your web site several times
through, just to make sure I would do the job right. Each time through,
though, I kept thinking to myself, there has to be an easier way than
sticking my head back into a cramped, poorly lit pantry, trying to
align, then screw down, these brackets.
Now, I'm no pro, but I've done my share of DIY
projects. There's a couple of things I can almost guarantee with a
project like this. First, there will be bloody knuckles. The second
thing, sometimes related to the first, is that there will be cursing.
So I'm reading your instructions, thinking, there are tight dark corners
in there, and drawer slides that need to be lined up perfectly (or at
least, close to perfect) -- there will be cursing for sure, and probably
bloody knuckles! Why, I'm thinking to myself, do I have to attach those
slides in place? Why can't I take these removable shelves out of the
pantry and fasten the slides in a nice, open, well-lighted space, where
there's plenty of room? All I have to do, I'm thinking, is get the
proper measurements, mark the shelves, and it should work.
I figured I'd try the first of the four shelves,
and if it worked, I'd finish the other three that way. If not, the
worst case scenario is that I have to turn the shelf upside down to
avoid misplaced screw holes, and start over, using your instructions.
I took some photos to document the process --
feel free to use them if you'd like. And, if these instructions make
sense, use them, too.
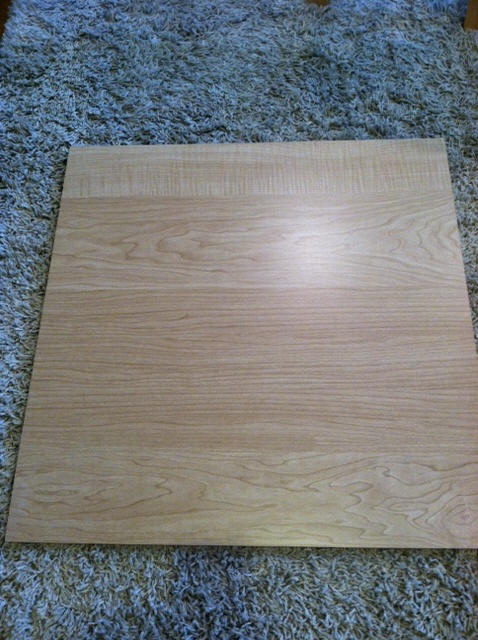
The "bare shelf" picture shows the removable
shelf -- pretty typical, laminated mdf. The only trick here is to make
sure you work with the laminated edge exposed - the back edge is bare
mdf, and you want that towards the back.
My shelves are 22 1/4" wide. I placed the
drawer, in the slides, on the shelf (see "drawer in brackets no screws"
picture) and measured. That width was 20 3/4". The difference is 1
1/2"; divided by two, that's 3/4" on each side. This approach will only
work, I suppose, if your placement (like mine) is symmetric, same
clearance on both sides. The front to back placement was simply a
matter of judgment, making sure there was enough clearance for the
pantry door.
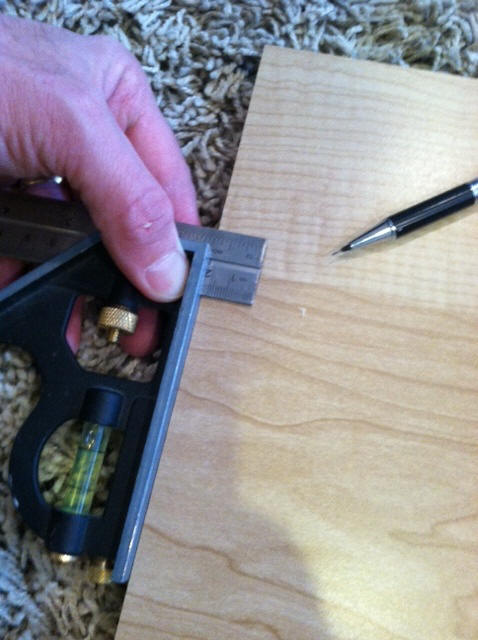
I took my handy square, set the ruler gauge at
3/4", and marked a line on both sides, front and back, approximately
where the slide brackets would be. See photo, "measuring in from the
side". I did the same from the back edge of the shelf, with the proper
distance. On subsequent shelves, I knew the 3/4" was constant from the
sides, and for the back edge, I simply loosed the nut on the gauge,
adjusted the ruler, and used that.
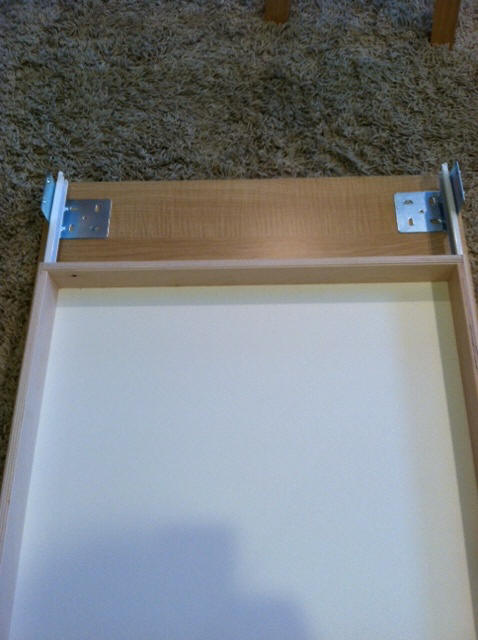
Next, I screwed in the slides, one screw per
bracket, in the slots (not the center hole), so I would have "play" in
all directions, if needed. See photo, "one back screw." I inserted the
drawer, and tested it out, making sure it glided smoothly. When I was
happy (very, very little adjustment was needed), I pulled the drawer
slightly forward, and placed a screw in the center hole. I carefully
removed the drawer, tightened the screws in the front slots, and placed
the center screw. I tested the drawer again -- still glided smoothly.
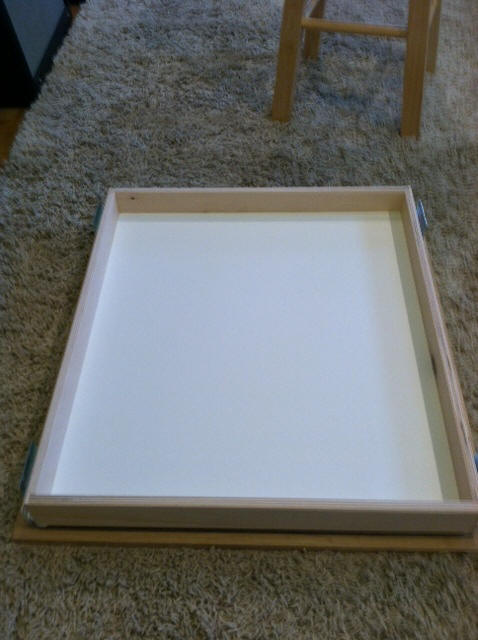
I then placed the shelf in the pantry. See
photo, "Shelf in place." Once again, I placed the drawer in and tested,
making sure there was smooth glide and clearance. See photo, "Drawer in
place." Satisfied, I placed two screws into the back wall, as you
suggest on your site, to make sure the shelf doesn't tip forward when
the drawer is extended.
The first time worked like a charm. I was
pleased, so I decided to take the photos of the second shelf (the ones I
have attached). On the third, I thought I'd time myself, since I had
the process down. Using only a hand screw driver (no power tools), and
taking my time, no hurrying, the third shelf took 7 minutes, 17
seconds. I didn't time the fourth shelf, but I think it was faster than
the third.
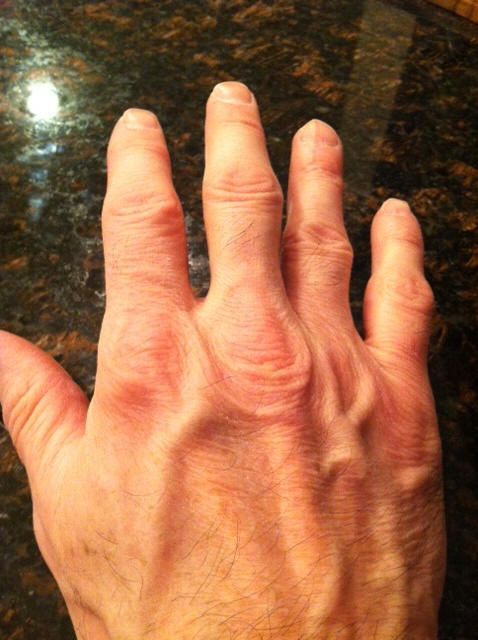
And, as you can see from the last photo, no
bloody knuckles, and (you'll have to take my word) no cursing!
My wife and I love the shelves, and we will
definitely recommend them to all our friends!
Bert S. Braud
The Popham Law Firm
|